Projects, libraries and cells
The window
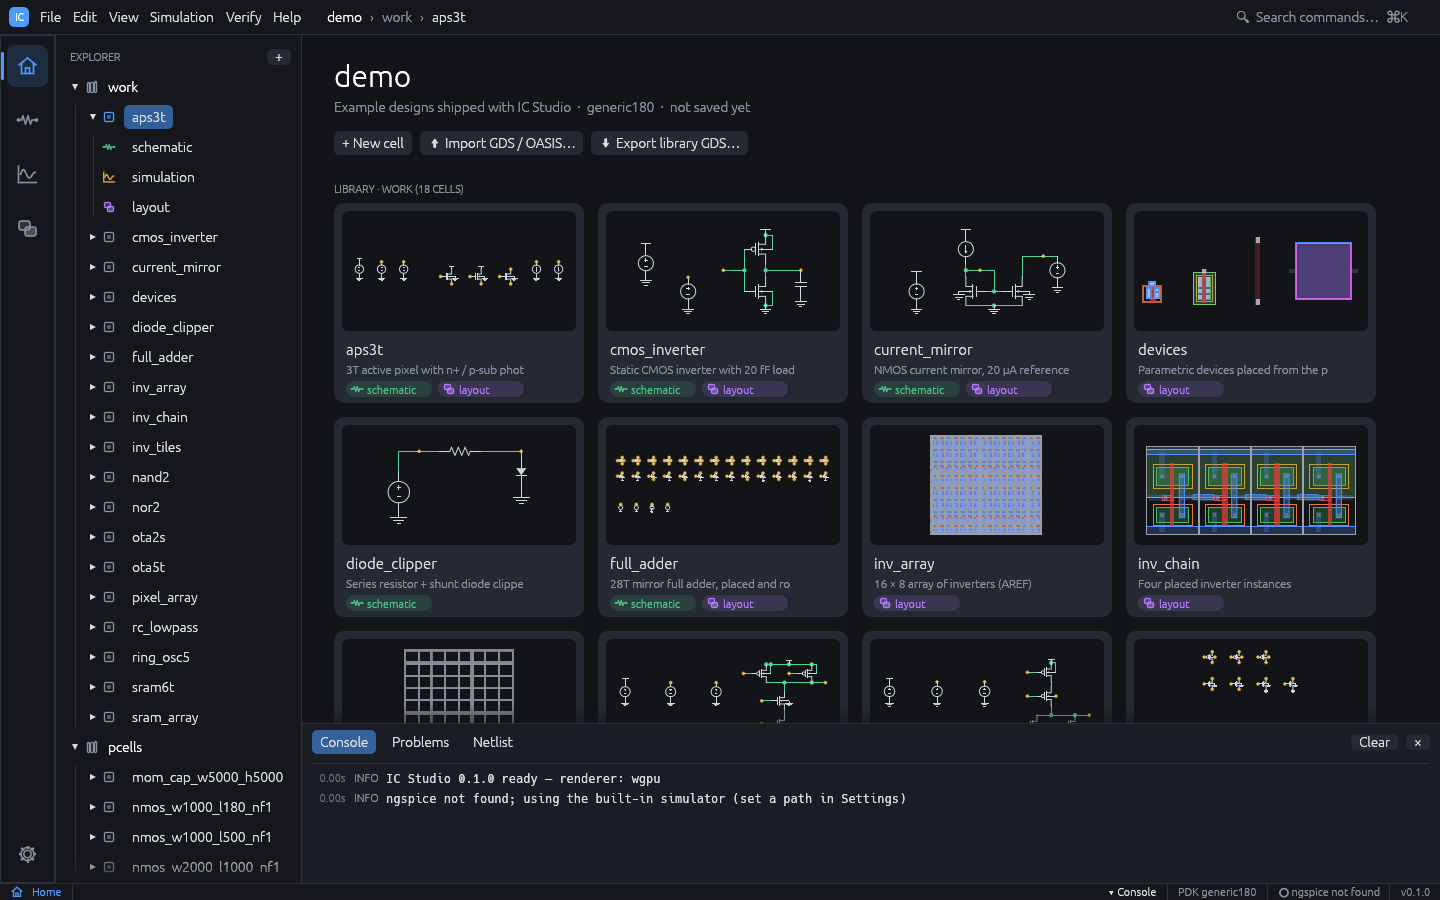
- Menu bar (see Menus below) with a breadcrumb
project > library > cell. A dot after the cell name means unsaved changes. On the right, Search commands… opens the command palette. - Activity bar (far left): the four workspaces Home, Schematic, Simulation and Layout
(
Ctrl+1toCtrl+4), and the Settings gear at the bottom. - Explorer: libraries, cells and their views.
- Cell tabs above the editor.
Ctrl+Wcloses the active tab. - Bottom panel (
Ctrl+J): Console (log), CIW (SKILL prompt), Problems (schematic checker findings) and Netlist (the SPICE netlist of the active cell). - Menus: File, Edit, View, Simulation, Verify, Tools (design copilot, optimizer, calculator, sweeps, results and browsers, generators, DRC rule designer, stream layer map, dummy fill, SKILL; see Tools) and Help (user guide, shortcuts, check for updates). In the Layout workspace the Create and Options menus are added.
- Status bar: workspace, zoom, selection, technology name, ngspice status and, while an agent is connected, “MCP live”.
Creating and opening projects
The welcome page (shown when no project is open) has three cards: Open demo project, New project… and Open project…, plus a list of recent projects.
- File > New Project…: enter a name (letters, digits,
_and-) and a parent folder. The project is created in<folder>/<name>with the generic 180 nm technology. Check the demo option to start from the demo designs instead. - File > New Demo Project: creates the demo project in memory. Use File > Save to choose a folder.
- File > Open Project… (
Ctrl+O): pick the project folder (the one containingic-studio.json). File > Open Recent lists recent projects. - File > Save (
Ctrl+S) and Save As… (Ctrl+Shift+S). When saving to a folder that is neither empty nor an existing project, a subfolder named after the project is created. - File > Close Project. Closing, quitting or opening another project with unsaved changes asks whether to Save, Discard or Cancel.
Cells and views
- New cell (
Ctrl+N, the+in the Explorer header or + New cell on the Home page): choose the library, a cell name, an optional description and which views to create (schematic, layout). - Click a cell in the Explorer to open it. Expand it to see its schematic, simulation and layout views; a missing view is shown dimmed with + create, and clicking it creates an empty view.
- Right-click a cell for Open schematic, Open layout, Rename… and Delete…. Deleting removes the cell’s files from disk when the project is saved.
- The Home workspace shows the project overview: a thumbnail card per cell, plus + New cell, Import GDS / OASIS… and Export library GDS… buttons.
Command palette
Ctrl+K or Ctrl+Shift+P opens the palette. Type words to filter (all words must
match), use the arrow keys and Enter to run a command, Esc to close. It contains every
menu action plus Open <lib>/<cell> · schematic and · layout entries for every
cell, which makes it the fastest way to jump between cells.
On-disk format
A project is a folder of plain JSON files that work well with version control:
myproj/
  ic-studio.json          project manifest
  tech.json               technology: layers, rules, DRC deck, coefficients
  work/                   one folder per library
    cmos_inverter/        one folder per cell
      cell.json           cell metadata (name, description)
      schematic.json      schematic view (if present)
      layout.json         layout view (if present)
      sim.json            simulation setup
Libraries imported from GDS are stored differently (as a GDS file in the library folder
with a library.json), so large imports stay compact.
Import and export
| Action | Menu |
|---|---|
| Import a GDSII or OASIS file as a new library | File > Import > GDSII / OASIS… |
| Import a KLayout layer properties file as the technology | File > Import > KLayout layer properties… |
| Replace the technology with a PDK file | File > Import > PDK… |
| Export the active cell’s SPICE netlist | File > Export > SPICE netlist… |
| Export the active cell and everything it places to GDSII / OASIS | File > Export > Cell GDSII… / Cell OASIS… |
| Export every layout in the project to one GDSII / OASIS file | File > Export > Library GDSII… / Library OASIS… |
GDS / OASIS import keeps the hierarchy. Layers that are not in the technology are added to it
(and reported in the console). After import, the top cell opens in the Layout workspace.
See Technology for .lyp and PDK import.